Skip to content

Tag: Dynamics 365

Bulk active Flows from a solution

Posted in Power Automation, Dynamics 365, and Power Platform

Scenario

We start our projects with our best practice solution and add further value over time to that solution. We also try to let benefit existing customers from the innovations and optimizations that get implemented in the solution over time, since their project has started.
Knowing our goal, you can imagine our setup. A source instance in our tenant and several target instances at different customers.
On top, some customers receive manual, an unmanaged version of the solution and other customers receive a managed version with an Azure Pipeline.

Issue

Flows can only be turned on if the user turning them on has permissions to connections being referenced by the connection reference.

Marc Schweigert: https://gist.github.com/devkeydet/f31554566b2e53ddd8e7e1db4af555a6

This causes no issues when importing manually, but as we use Application User to connect the Azure Pipeline, this ends with all Flows in the solution turned off after solution import.

Solution – Bulk active Flows

One solution would be to create a PowerShell script in the Azure Pipeline that impersonate the owner of a connection reference (Source).
I decided to create a Power Automated based solution to bulk active Flows, with an Environment Variable that contains Flows that should not be enabled automatically.

Step by step

Step 1 – Environment Variable:
Create an Environment Variable of type JSON to store the Flows that should not be activated automatically. Doing this as an Environment Variable enables you to define this per instance.

To enable our Flow to find the right Flows by name, workflowid or workflowuniqueid, the structure should be:

{
  "Flow 1": "worklowid",
  "Flow 2": "workflowidunique"
}

Step 2: The Trigger of the Flow

A managed solution only get modified when you import an update of it. Therefore, this is my trigger, filtered on my solution.

The dataverse flow trigger on table 'Solutions'.

Step 3: Some vars and const

Vars and const for the Flow.

Step 4: Get the exclusion list

I needed to put it in a compose action. Working directly with the environment variable did not work for me.

Load the exclusion list in a compose.

Step 5: Get inactive Flows from the solution

Get the inactive Flows from the solution with a fetch to bulk active flows later.

I found the FetchXml in the Dynamics Community, it was an answer from Scott Durow where he helped someone. By that way, thank you, Scott, that inspired me to my solution.

<fetch>
  <entity name="workflow">
    <attribute name="category" />
    <attribute name="name" />
    <attribute name="statecode" />
    <attribute name="workflowidunique" />
    <filter>
      <condition attribute="category" operator="eq" value="5" />
      <condition attribute="statecode" operator="eq" value="0" />
    </filter>
    <link-entity name="solutioncomponent" from="objectid" to="workflowid">
      <link-entity name="solution" from="solutionid" to="solutionid">
        <filter>
          <condition attribute="uniquename" operator="eq" value=@{outputs('Solution')} />
        </filter>
      </link-entity>
    </link-entity>
  </entity>
</fetch>

Step 6: Loop over fetched Flows

Loop to bulk active Flows.

Step 6.1 Check inside the loop if the current Flow is not excluded

Condition to excluded flows from the environment variable.
contains(string(outputs('Get_ExclusionList')), string(items('Loop_fetched_Processes_from_Solution')?['workflowid']))


contains(string(outputs('Get_ExclusionList')), string(items('Loop_fetched_Processes_from_Solution')?['workflowidunique']))


contains(string(outputs('Get_ExclusionList')), string(items('Loop_fetched_Processes_from_Solution')?['name']))

Step 6.1.1 Activate the current Flow in the TRUE path of the condition

Update the record in Dataverse to activate the flow.

Step 6.1.2 Log if an error happens after activating the current Flow

A counter and string for error logging.

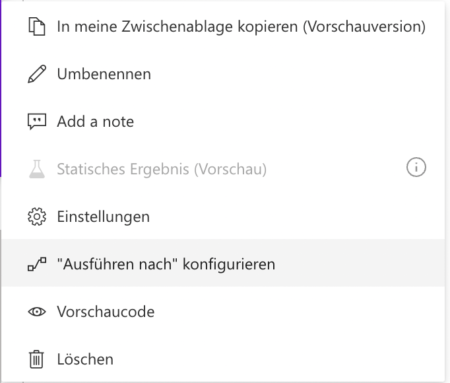
Click the three dots on the “Counter++” action and choose “Configure run after”.

Open the 'run after' menu.
Configure the 'run after' option.

Step 7: Check if an error occurred, after the loop is completed

Condition to inform about errors.

Step 7.1 If an error occurred, get the URL of the CRM instance

Get the CRM URL from OData.Id.

I described how to get it in my post: Get CRM URL in Power Automate

Step 7.2 Send a notification

Send an email with Power Automate.

Let me a comment if you find this helpful or how you solved this or a similar problem.

Best practices for ClickDimensions deployment

Posted in Dynamics 365, ClickDimensions, and Power Platform

Table of content

  1. Basics
  2. Deployment
  3. Customizing
  4. Transport
  5. Updates
  6. Redeployment

1. Basics

ClickDimensions is only accessible and configurable through Dynamics 365 Customer Engagement. This is achieved through CRM records (forms, templates, emails, etc.) that are linked by their GUID and the CRM instance specific ClickDimensions account key to an ClickDimensions editor/designer that stores its content in the ClickDimensions cloud infrastructure on Azure.

Like Microsoft, ClickDimensions provides its customers sandboxes and additional production instances for their Dynamics 365 CE environment.
A sandbox instance is hereby fully functional and can send out an email blast to your CRM records like any production instance. It’s not a safe playground if your test environment is a copy of the productive data.

2. Deployment

After purchase, you register for a ClickDimensions cloud instance(s) with your CRM instance(s). Afterwards, you will receive an email with a download link for a Dynamics 365 solution for each of your registered ClickDimensions instances. Make sure not to mix up them with your CRM instances, because the ClickDimensions account key fix embedded in the ClickDimensions solution. The same applies later to updates.

Create a backup solution in Dynamics 365 save ribbon customizations on account, campaign, contact, lead, list, opportunity, team and systemuser. Add only the required entities with their metadata to keep the solution as clean as possible.

If you have Dynamics 365 CE instances that will have no ClickDimensions Instance – like a development environment, you can import any of the ClickDimenions solutions to have the same customizing for all Dynamics 365 instances

3. Customizing

The CRM parts of ClickDimensions can be customized like any other CRM elements. Avoid customizing of views and form sections, they could be overwritten during an update.

Don’t forget to publish the metadata to the ClickDimensions cloud if you created fields that should be accessible through ClickDimensions.

Processes that you build on top of ClickDimensions processes, will have no influence on the ClickDimensions cloud. A campaign automation instance that has a posted form as an entry point, will still run with the same contact from the start, even if you updated it on the posted form in CRM.

4. Transport

The ClickDimensions Export and Import let you transport Domains, Email Templates, Form Fields, Landing Pages and Survey Questions.

All other configuration records must be transported manually. I prefer the XrmToolBoxDataTransporter to create records across all CRM instances. Pay attention to only transport the fields that you can edit in CRM. Exclude the CRM GUID and any other ID/Key from ClickDimensions (except for redeployment).
Web content and campaign automations must be rebuilt manually.
Check also the linked web content in email templates to prevent submissions to wrong CRM instance.

Those of you who are willing to experiment can try to capture and modify the body of the web request that is submitted when you save a web content.

5. Updates

ClickDimensions has a 4-week release cycle.
In the Release Notes, you find detailed information of what has changed and if a solution update is required to receive new features or bug fixes.
Most of the changes take place on the server, and a solution update is recommended by ClickDimensions once a quarter.

I prefer the manual update of the ClickDimensions solution, because I can determine when the system changes.
As the release cycle is really short, I advise to download the solutions for all instances at once. Otherwise, it could happen that you download different versions. Don’t forget your backup solution and the import in your CRM instances without ClickDimensions the have the same customizing over all.

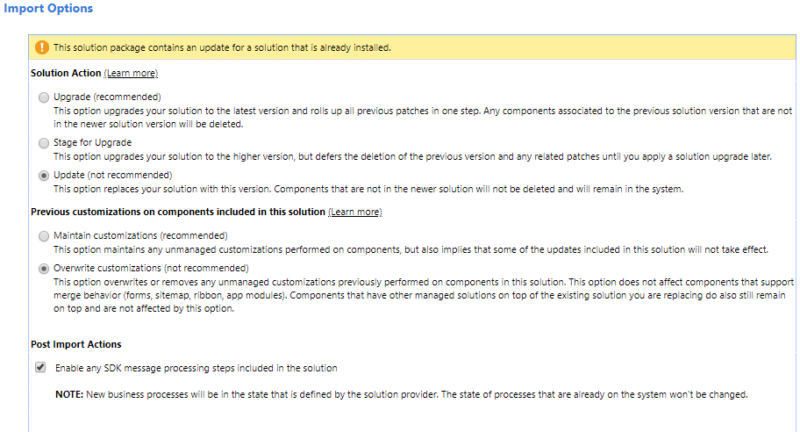
During the update, you have to choose the settings that are “not recommended” by Microsoft to overwrite the existing ClickDimensions customizations.

It makes sense again to have a backup solution in with ribbon customizations from account, campaign, contact, lead, list, opportunity, team, systemuser and additional customizations on ClickDimensions entities.

ClickDimensions deployment

6. Redeployment

Make sure to have a ClickDimensions solution of the system that you overwrite and a backup of the ClickDimensions records with all attributes from that system.

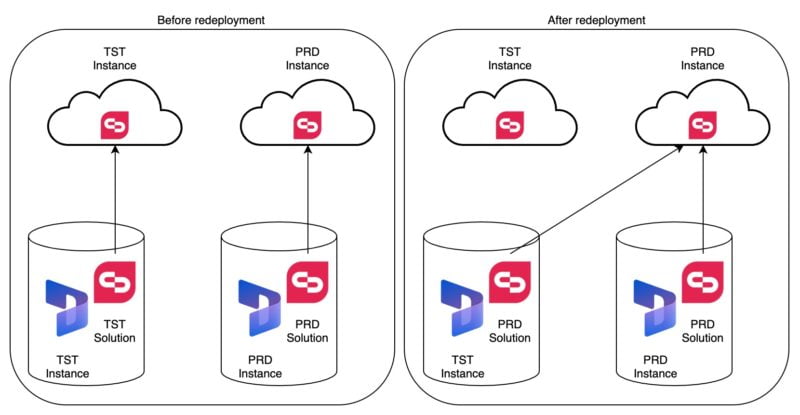
The redeployed CRM instance will still try to connect to ClickDimensions environment of the source CRM.

ClickDimensions deployment


Disable all the ClickDimensions plugins, the redeployed CRM instance will still try to connect to ClickDimensions environment of the source CRM and could delete your productive data in the ClickDimensions cloud.

Delete the copied ClickDimensions records from the redeployed system. Delete also the records in the “Execute Send” table through the advanced find.

To restore the ClickDimensions records, you can import the backup of these records, with all keys and the original GUID of the records.

Reconnect the CRM instance to the correct ClickDimensions cloud instance, by importing the ClickDimensions solution from the first redeployment step.
This will restore the account key, enable the plugins, and you are able again to create new records and open the restored records in the redeployed system.

Understand email statistics in ClickDimensions

Posted in ClickDimensions, Dynamics 365, and Power Platform

Email statistic calculation

If you’ve ever wonder why the count of your marketing lists members differs from the email statistic that ClickDimensions has sent, then the following list will help you to understand how ClickDimensions calculates the email delivery.

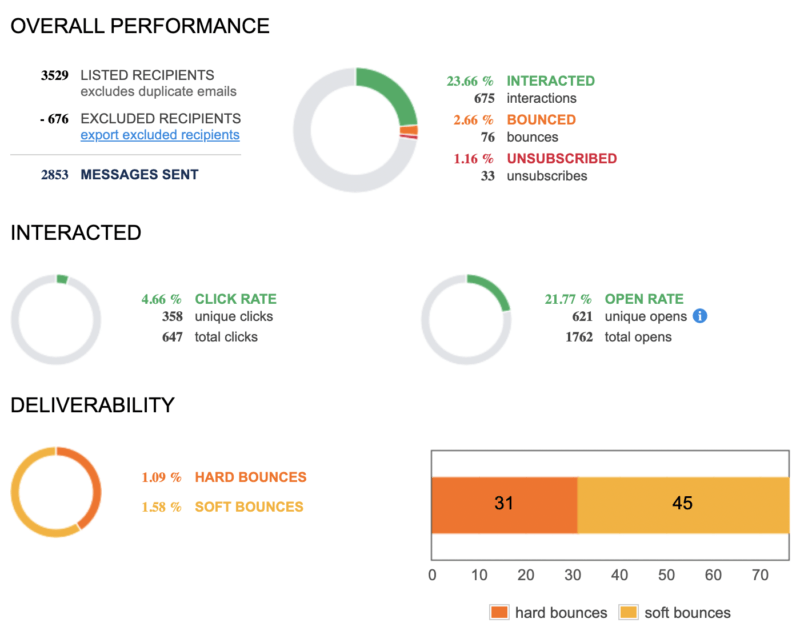
Email statistic report from ClickDimensions
  • + LISTED RECIPIENTS
    • + Recipients – leads, contacts and accounts that are connected to the ‘cdi_emailsend’ as recipient, directly or via marketing lists
    • – Duplicate email addresses over the recipients
  • – EXCLUDED RECIPIENTS
    • + Recipients without an email address
    • + Email addresses that are already blocked
      • + Email addresses with a previous hard bounce
        • + DNS failures
        • + Generic Bounces: No RCPT
        • + Invalid Recipients
      • + Email addresses with 4 soft bounces within a 90-day period
      • + Email addresses that were blocked in a previous email
    • + Recipients with unsubscribed email addresses
      • + Recipients ‘donotemail’ setting is ‘Do not allow’
      • + Recipients ‘donotbulkemail’ setting is ‘Do not allow’
      • + Recipients whose email address is listed in the ‘Unsubscribe’ records
      • + Recipients whose email address is opted-out from the related subscription list
      • + Recipients whose email address have no opt-in for the related subscription list (only in opt-in model)
    • + Suppressed recipients
      • + Email addresses from leads, contacts and accounts that are connected to the ‘cdi_emailsend’ via a suppressed marketing list
  • = MESSAGES SENT
  • – BOUNCES
    • + Hard bounces
      • + DNS Failures
      • + Generic Bounces: No RCPT
      • + Invalid Recipients
    • + Soft bounces
  • = EMAILS DELIVERED

Queries for email statistic in D365CE

This list contains the OData 4.0 queries to collect all the data for email delivery and interactions for reporting purposes.

Email statistic data  stored in D365CE
GET [Organization URI]/api/data/v9.1/
  • Excluded recipients
    cdi_excludedemails?$filter=_cdi_emailsendid_value eq {ID}
  • Recipients without an email address
    cdi_excludedemails?$filter=_cdi_emailsendid_value eq {ID} and cdi_reason eq 4
  • Recipients with already blocked email addresses
    cdi_excludedemails?$filter=_cdi_emailsendid_value eq {ID} and cdi_reason eq 5
  • Recipients with unsubscribed email addresses
    cdi_excludedemails?$filter=_cdi_emailsendid_value eq {ID} and (cdi_reason eq 1 or cdi_reason eq 7
  • Recipients that are connected via a suppressed marketinglist
    cdi_excludedemails?$filter=_cdi_emailsendid_value eq {ID} and cdi_reason eq 6
  • Messages sent
    cdi_sentemails?$filter=_cdi_emailsendid_value eq {ID}
  • Hard bounces
    cdi_emailevents?$filter=_cdi_emailsendid_value eq {ID} and (cdi_type eq 10 or cdi_type eq 15 or cdi_type eq 9
  • Soft bounces
    cdi_emailevents?$filter=_cdi_emailsendid_value eq {ID} and cdi_type eq 3
  • Emails delivered
    cdi_sentemails?$filter=_cdi_emailsendid_value eq {ID} and cdi_bouncescount lt 1 and cdi_deliveriescount gt 0
  • Interactions
    cdi_sentemails?$filter=_cdi_emailsendid_value eq {ID} and (cdi_clickscount gt 0 or cdi_openscount gt 0)
  • Unique opens
    cdi_sentemails?$filter=_cdi_emailsendid_value eq {ID} and (cdi_openscount gt 0)
  • Total opens
    cdi_emailevents?$filter=_cdi_emailsendid_value eq {ID} and cdi_type eq 2
  • Unique clicks
    cdi_sentemails?$filter=_cdi_emailsendid_value eq {ID} and (cdi_clickscount gt 0)
  • Total clicks
    cdi_emailevents?$filter=_cdi_emailsendid_value eq {ID} and cdi_type eq 4
  • Unsubscribes
    cdi_emailevents?$filter=_cdi_emailsendid_value eq {ID} and cdi_type eq 6

Inferred opens

An inferred open is counted when a recipient clicks a link in an email or unsubscribes, but does not download the images (and also the tracking pixel) in the email.

The unique opens in the email statistics in Dynamics 365 CE do not include inferred opens.
The ClickDimensions email report includes the inferred opens in its unique opens count.


KPIs calculation from email statistic values

Basics for marketeers but maybe not for Dynamics 365 folks and of course it is also handy to have all in one place.

  • Bounce rate
    Bounces / Message sent * 100
  • Soft bounce rate
    Soft bounces / Message sent * 100
  • Hard bounce rate
    Hard bounces / Message sent * 100
  • Delivery rate
    Deliveries / Messages sent * 100
  • Interaction rate
    Interactions / Messages sent * 100
  • Open rate
    Unique opens / Messages sent * 100
  • Click rate
    Unique clicks / Messages sent * 100
  • Unsubscribe rate
    Unsubscribes / Messages sent * 100

RetrieveTotalRecordCount Bookmarklet

Posted in Dynamics 365, and Power Platform

Counting records in CRM can be tricky and time consumption when there are more than 5.000 records in the table. There are several ways and tools to do this that are already well described in the community.

When you are fine with the fact that the numbers you receive are static from a count last night, you can use the RetrieveTotalRecordCount function.
There are descriptions in the community on how to use it, too:

I combined both and created a bookmarklet, so that you don’t need to to memorize the url path or modify a bookmark everytime when you are in a different system or need another table (entity).

The RetrieveTotalRecordCount Bookmarklet

Create a normal bookmark in you browser and replace its url with the following code:

javascript:function proc(){var r = JSON.parse(this.responseText).EntityRecordCountCollection,t = [];for (let i = 0; i < r.Keys.length; i++) {t.push(r.Keys[i]+"="+r.Values[i])}prompt("Result", t.join(","))} etn = prompt("EntitySchemaName as CSV?", "account,contact").split(",").map((str) => str.replace(/\s/g,''));var oReq = new XMLHttpRequest();oReq.addEventListener("load", proc);oReq.open("GET","api/data/v9.1/RetrieveTotalRecordCount(EntityNames=['"+etn.join("', '")+"'])");oReq.send();

You can use it at any place inside of D365 CE. You only need to write in a SchemaName of an entity (table) or several, comma separated SchemaNames and it answers you with the EntitySetName and the number of records in it (counted last night).

Get CRM URL in Power Automate

Posted in Dynamics 365, Power Automation, and Power Platform

Sometimes you need to work with the URL of your CRM within Power Automate, for example:

  • to relate or unrelate two records with the Common Data Service (current environment) connector
    CRM URL in Power Automate
  • or writing an email with a hyperlink to a record.

If you have a multi-staged environment and you build your Flow solution aware, you don’t want to update your static URLs after each transport.

Solution

‘Recycle’ the OData Id from a previous CDS action.

CRM URL in Power Automate
  1. We need an previous CDS action that has an OData Id within its output (like shown above).
    If you have no action like this, consider to create a “List records” action which is limited to 1 by the “Top count” option.
  2. Create a “Compose” action and give it the OData_Id as input.
  3. Create an other “Compose” action and give it following expression to receive the CRM URL.
    concat(join(take(split(outputs('OData_Id'), '/'), 3), '/'), '/')
  4. Create an other “Compose” action and give it following expression to receive the OData URL.
    concat(join(take(split(outputs('OData_Id'), '/'), 6), '/'), '/')
Compose URL in Flow

How it works

  • concat(join(take(split(outputs('OData_Id'), '/'), 3), '/'), '/')
    Contains the OData Id we’ve stored in the first “Compose” action.
    "https://yourcrm.crm4.dynamics.com/api/data/v9.1/cdi_postedform(792189BA-BA04-E711-80F6-C4346BAC4DDC)"

  • concat(join(take(split(outputs('OData_Id'), '/'), 3), '/'), '/')
    Cuts the URL string in separate substring wherever a slash (‘/’) is.
    0: "https:"
    1: ""
    2: "yourcrm.crm4.dynamics.com"
    3: "api"
    4: "data"
    5: "v9.1"
    6: "cdi_postedform(792189BA-BA04-E711-80F6-C4346BAC4DDC)"

  • concat(join(take(split(outputs('OData_Id'), '/'), 3), '/'), '/')
    Merge the first 3 entries of the splitted URL to a new array.
    0: "https:"
    1: ""
    2: "yourcrm.crm4.dynamics.com"

  • concat(join(take(split(outputs('OData_Id'), '/'), 3), '/'), '/')
    Merge the new array into a string and separate the entries by a slash (‘/’).
    "https://yourcrm.crm4.dynamics.com" 

  • concat(join(take(split(outputs('OData_Id'), '/'), 3), '/'), '/')
    Create a new string with the merged URL and put a slash (‘/’) at its end.
    "https://yourcrm.crm4.dynamics.com/" 

In the same way you receive the OData URL when you “take” the first 6 elements instead of the first 3 elements.