Table of content
1. Basics
ClickDimensions is only accessible and configurable through Dynamics 365 Customer Engagement. This is achieved through CRM records (forms, templates, emails, etc.) that are linked by their GUID and the CRM instance specific ClickDimensions account key to an ClickDimensions editor/designer that stores its content in the ClickDimensions cloud infrastructure on Azure.
Like Microsoft, ClickDimensions provides its customers sandboxes and additional production instances for their Dynamics 365 CE environment.
A sandbox instance is hereby fully functional and can send out an email blast to your CRM records like any production instance. It’s not a safe playground if your test environment is a copy of the productive data.
2. Deployment
After purchase, you register for a ClickDimensions cloud instance(s) with your CRM instance(s). Afterwards, you will receive an email with a download link for a Dynamics 365 solution for each of your registered ClickDimensions instances. Make sure not to mix up them with your CRM instances, because the ClickDimensions account key fix embedded in the ClickDimensions solution. The same applies later to updates.
Create a backup solution in Dynamics 365 save ribbon customizations on account, campaign, contact, lead, list, opportunity, team and systemuser. Add only the required entities with their metadata to keep the solution as clean as possible.
If you have Dynamics 365 CE instances that will have no ClickDimensions Instance – like a development environment, you can import any of the ClickDimenions solutions to have the same customizing for all Dynamics 365 instances
3. Customizing
The CRM parts of ClickDimensions can be customized like any other CRM elements. Avoid customizing of views and form sections, they could be overwritten during an update.
Don’t forget to publish the metadata to the ClickDimensions cloud if you created fields that should be accessible through ClickDimensions.
Processes that you build on top of ClickDimensions processes, will have no influence on the ClickDimensions cloud. A campaign automation instance that has a posted form as an entry point, will still run with the same contact from the start, even if you updated it on the posted form in CRM.
4. Transport
The ClickDimensions Export and Import let you transport Domains, Email Templates, Form Fields, Landing Pages and Survey Questions.
All other configuration records must be transported manually. I prefer the XrmToolBox – DataTransporter to create records across all CRM instances. Pay attention to only transport the fields that you can edit in CRM. Exclude the CRM GUID and any other ID/Key from ClickDimensions (except for redeployment).
Web content and campaign automations must be rebuilt manually.
Check also the linked web content in email templates to prevent submissions to wrong CRM instance.
Those of you who are willing to experiment can try to capture and modify the body of the web request that is submitted when you save a web content.
5. Updates
ClickDimensions has a 4-week release cycle.
In the Release Notes, you find detailed information of what has changed and if a solution update is required to receive new features or bug fixes.
Most of the changes take place on the server, and a solution update is recommended by ClickDimensions once a quarter.
I prefer the manual update of the ClickDimensions solution, because I can determine when the system changes.
As the release cycle is really short, I advise to download the solutions for all instances at once. Otherwise, it could happen that you download different versions. Don’t forget your backup solution and the import in your CRM instances without ClickDimensions the have the same customizing over all.
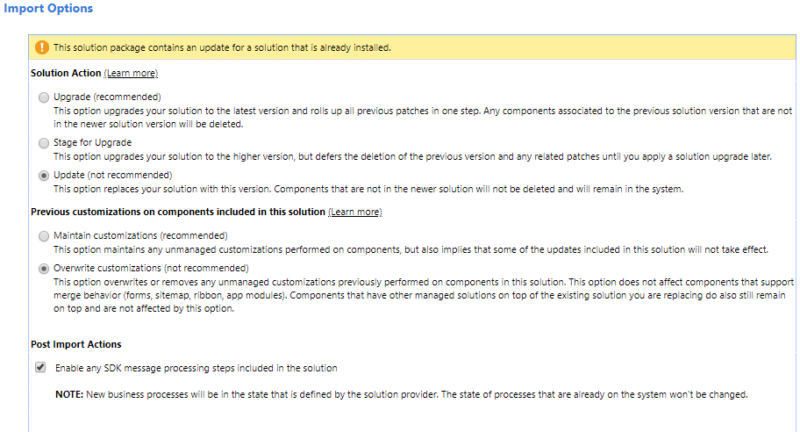
During the update, you have to choose the settings that are “not recommended” by Microsoft to overwrite the existing ClickDimensions customizations.
It makes sense again to have a backup solution in with ribbon customizations from account, campaign, contact, lead, list, opportunity, team, systemuser and additional customizations on ClickDimensions entities.
6. Redeployment
Make sure to have a ClickDimensions solution of the system that you overwrite and a backup of the ClickDimensions records with all attributes from that system.
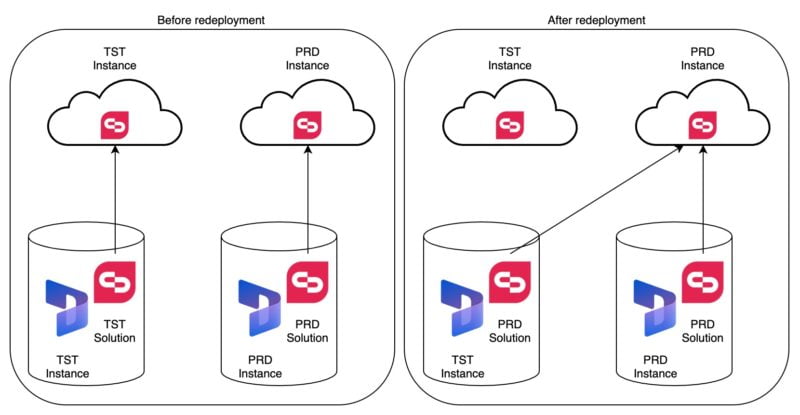
The redeployed CRM instance will still try to connect to ClickDimensions environment of the source CRM.
Disable all the ClickDimensions plugins, the redeployed CRM instance will still try to connect to ClickDimensions environment of the source CRM and could delete your productive data in the ClickDimensions cloud.
Delete the copied ClickDimensions records from the redeployed system. Delete also the records in the “Execute Send” table through the advanced find.
To restore the ClickDimensions records, you can import the backup of these records, with all keys and the original GUID of the records.
Reconnect the CRM instance to the correct ClickDimensions cloud instance, by importing the ClickDimensions solution from the first redeployment step.
This will restore the account key, enable the plugins, and you are able again to create new records and open the restored records in the redeployed system.

