Skip to content

Month: February 2017

How to load Javascript from a webresource

Posted in Dynamics 365, Power Platform, and Revive

Imagine an usecase where you can dynamically load a Javascript from the CRM webresources because it doesn’t need to be loaded on every single form load. Perhaps a polyfill to add missing browser functions or a Javascript library like jQuery. Here it is…

function loadJavascriptFromWebresource(strWebresourceName, async)
{
    //sync or async (default)
    if (async == undefined) { var async = true; }

    //build a new webrequest to get the content of the webresource by its name
    var req = new XMLHttpRequest();
    req.open("GET", Xrm.Page.context.getClientUrl() + "/api/data/v8.0/webresourceset?" +
        "$select=content&$filter=name eq '" + strWebresourceName + "'", async);
    req.setRequestHeader("OData-Version", "4.0");
    req.setRequestHeader("OData-MaxVersion", "4.0");
    req.setRequestHeader("Accept", "application/json");
    req.setRequestHeader("Content-Type", "application/json; charset=utf-8");
    req.onreadystatechange = function ()
    {
        if (this.readyState === 4)
        {
            req.onreadystatechange = null;
            if (this.status === 200)
            {
                //get the result of the request
                var result = (JSON.parse(this.response)).value[0].content;

                //decode the base64 encoded result
                var script = atob(result);

                //make an indirect eval call to make it globally available
                window.eval(script);
            }
            else
            {
                Xrm.Utility.alertDialog(this.statusText);
            }
        }
    };
    req.send();
}

My personal usecase was to add a promises polyfill to the Internet Explorer. So, if you combine this post, my post about “Internet Explorer and promises” and you have a promises polyfill in your CRM webresources, you can use promises and do only load the polyfill in case the browser doesn’t support it.

Bug in business process flows created before december 2016 update (CRM v8.2)

Posted in Dynamics 365, Power Platform, and Revive

Microsoft has intoduced some really nice features with Dynamics 365 (CRM v8.2), but also a bug for business process flows of existing customers created before the december 2016 update. This causes an error message on switching to another business process flow or the completly disappearance of the business process flows from the form.

Jiří Pešík has already blogged a method to identify and resolve the issue, but from my point of view it is not cloud suitable and not supported,because there are changes made directly on the database.

Cause

With the new features came also new fields in the system. Unfortunately they haven’t been filled during the update for already existing business process flows. One of them is the required field “uniquename” of the “workflow” entity. You can even see it when open the details pane of the new business process flow editor.

Identification

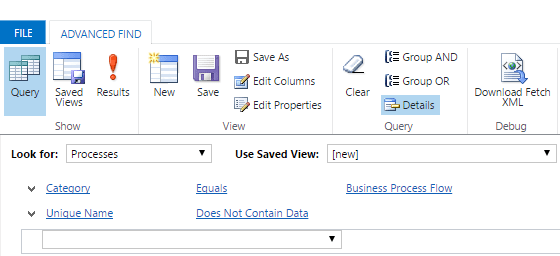
You can use a simple query in the advanced find to identify concerned business process flows.

Resolution

Is just as easy as the identification. Deactivate your business process flow and the system will fill the name automatically and you can activate it again immediately. No code, no sql, just magic. 😉

Disabled “From” field on email entity

Posted in Dynamics 365, and Power Platform

After an update to Dynamics CRM 8.1.0.359 it happens that the “From” field of the email entity is permanently disabled / locked on all forms, even in the workflow-editor.
It seems as the updates deletes a part of the fieldsettings. But you can easily restore the settings.

  1. Create a new solution with the “From” field of the email entity in it.
  2. Export the solution, unzip it and open the customizations.xml.
  3. Find the tag:
    <LookupTypes />
  4. Replace it with:
    <LookupTypes>
       <LookupType id="00000000-0000-0000-0000-000000000000">8</LookupType>
       <LookupType id="00000000-0000-0000-0000-000000000000">2020</LookupType>
    </LookupTypes>
  5. Save the customizations.xml and zip it again into the solution file.
  6. Upload and publish the updated solution.

All credits go to the people of the following threads. They found and tested the solution.