Skip to content

Author: Ben

Dynamics CRM 2015

Posted in Dynamics 365, and Power Platform

Vor einem Jahr hatten wir das letzte große Update für Dynamics CRM und laut Roadmap steht uns das Q4/2014 Update (Codename “Vega”) bevor. Seit Mitte September wird dieses nun offiziell als Dynamics CRM 2015 (V 7.0) angekündigt und somit kommt noch 2014 das nächste Major Release auf den Markt. Ich möchte euch hier einen kurzen Überblick der Neuerungen geben.

Da ich selbst keinen Zugang zur Beta habe, kann ich euch keine Infos aus erster Hand liefern, werde hier aber alles was ich so Netz gefunden habe zusammentragen.

Erwartungshaltung

Im Gegensatz zum letzten Update wird sich nicht so viel an der Benutzeroberfläche ändern, was ich gut finde. Es geht also mehr um die Verbesserung bzw. Erweiterung des bestehenden Systems. Dabei wurden viele Vorschläge, die ich auf connect.microsoft.com verfolgt habe, aufgegriffen. Feedback geben lohnt sich also. 🙂

Das Update auf Dynamics CRM 2015

Für Dynamics CRM OnPremise Kunden wurden die System-Anforderungen nach oben geschraubt. Man benötigt nun mindestens einen Windows Server 2012 mit SQL Server 2012.

Microsoft CRM Online Kunden durchlaufen wieder das sogenannte “Customer Driven Update”. Das bedeutet dass der Kunde mit Microsoft ein Datum innerhalb eines Update-Zeitraums vereinbart an dem seine Instanz aktualisiert wird.

Clientseitig benötigr man nun mindestens:

  • Windows 7 bzw. Windows Server 2012 Remote Desktop Services
  • Internet Explorer 10
  • MS Office 2010

Änderungen mit Dynamics CRM 2015

Allgemein

  • Ein neuer Button für den Direktzugriff auf die erweiterte Suche.
  • Ein neuer Button für den Direktzugriff auf die neue globale Suche!
    Diese unterstützt max. 10 Entitäten, kann auch Aktivitäten und Notizen durchsuchen und die Konfiguration erfolgt größtenteils über die QuickFindViews.
  • Die Vergleichsoperatoren wurden erweitert um mit Hierarchien arbeiten zu können (Above, AboveOrEqual, Under, UnderOrEqual, NotUnder).
  • Der Outlook Konfigurationsassistent wurde aktualisiert, funktioniert um Grunde aber noch wie vorher.
    Die Haputsächliche Neuerung ist dass er nun die Multi-Faktor-Authentifizierung unterstützt.
  • Der Begrüßungsbildschirm kann in den Systemeinstellungen deaktiviert werden.
  • Bestehende CRM Online Kunden können beim Anlegen einer zusätzlichen Instanz deren Region wählen.

Geschäftsprozesse

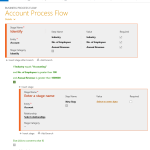
  • Dynamics CRM 2015 unterstützen Abzweigungen die im Geschäftsprozess Editor konfiguriert werden können.
    Bsp.: Ihr habe einen Prozess mit 5 Phasen, der aber unter Umständen auch nur 3 Phasen hat oder Phase 4 ist abhängig von einer Option aus Phase
    3.
    Bisher haben wir hier von unterschiedlichen Prozessen gesprochen. Nun kann man mit IF Abfragen in unterschiedlichen Zweige wechseln.

Geschäftsregeln

  • Der Editor kann Standard Werte setzen.
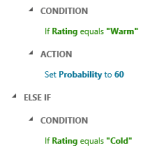
  • Bedingungsverzweigungen sind möglich, IF-ELSE.
  • Gruppierung von Ausdrücken, AND / OR.
  • Werden serverseitig ausgeführt, also auch bei Importen, Änderungen über das SDK oder Apps.
    Dabei werden Formularspezifische Aktionen (hide/show, etc.) ignoriert.

Hierarchien

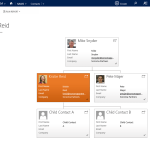
  • Mit Dynamics CRM 2015 können 1:n Beziehungenzur Abbildung von Hierarchien genutzt werden.
  • In der Hierarchien Ansicht werden die ersten 4 Felder eines definierten QuickView Formulars angezeigt.
  • Sie können für Ansichten und Suchen innerhalb der Oberfläche als Suchkriterium verwendet werden.
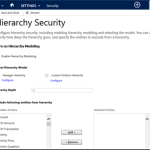
  • Das Sicherheitskonzept wird für Hierarchien erweitert. Bsp.: Zugriff auf alle untergeordnete Datensätze.

Produktkatalog

  • Die Kit-Produkte werden durch Produkt-Bundles abgelöst.
  • Up- und Cross-Selling Vorschläge durch Produktbeziehungen.
  • Vererbbare Produkteigenschaften.
  • Produkt-Lebenszyklusverwaltung mit Versionierung.

Outlook und Exchange Synchronisierung

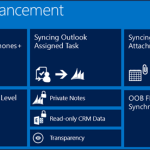
  • Zusätzliche Kontakt- und Aufgabefelder werden synchronisiert.
  • Anlagen von Terminen werden synchronisiert, sowie zugewiesene Aufgaben.
  • In Outlook als “Privat” markierte Elemente werden nicht mehr synchronisiert.
  • Die Synchronisierungs-Richtung wird mit Dynamics CRM 2015 konfigurierbar (Two-Way, One-Way, No-Way).

Customizing

  • Timer können pausiert oder zurückgesetzt werden.
  • Feldsicherheitsprofile können auf Standardfelder angewandt werden.
  • Erweiterungen des SDK im Bereich der Geschäftsprozesse.
  • Nested QuickCreate Forms.
    Bsp.: Erstellt ihr im Kontext eines QuickCreate Formulars einen Datensatz, den primären Kontakt einer Firma, öffnet sich erneut ein
    QuickCreate Formular.
  • Berechnete Felder erlauben das serverseitige Berechnen ihres Wertes mit statischen oder anderen berechneten Werten des aktuellen oder eines übergeordneten Datensatzes. Dabei kann auch mit IF-ELSE gearbeitet werden.
  • Rollup Felder aggregieren (SUM, MAX, MIN, COUNT) per Button oder regelmäßigen Systemjob, Werte aus untergeordneten Datensätzen bzw. Hierarchien.
    Pro Entität könnt Ihr max 10. Rollup Felder einsetzen und global max. 100.
  • Für eigene Entitäten kann global eine URL für eine Hilfeseite hinterlegt werden. Dieser können URL Parameter übergeben werden so dass die User direkt an der richtigen Stelle in eurer Hilfe landen.

Pass parameters to HTML Webresource

Posted in Dynamics 365, Power Platform, and Revive

A HTML webresource can not just only show HTML elements on your form, furthermore you can work with JavaScript in it and interact with your form. IF you want to access the Xrm namespace of the form inside your HTML webresource, you simply need prepend “window.parent” to your function call.

This looks like in this example:

var myId = window.parent.Xrm.Page.data.entity.getId();

If you need a lot of such calls, you can make your life easier and create your own local variable and assign it the complete Xrm namespace
This could look like this:

var Xrm = window.parent.Xrm;
    var myId = Xrm.Page.data.entity.getId();

Pass parameters to HTML Webresource

Alternatively, you can also pass static values to your webresource. Just add a custom parameter in properties dialog of the webresource.

You can access the custom and contaxt parameters with the following script inside your webresource:

function getWebresourceParameter()
    {
        var userParameters = [], passedParameters = [];
        if (location.search != "")
        {
            var vals = location.search.substr(1).split("&");
            for (var i = 0; i < vals.length; i++)
            {
                vals[i] = vals[i].split("=");
                if (vals[i][0].toLowerCase() == "data" && vals[i][1] != "")
                {
                    var userVals = decodeURIComponent(vals[i][1]).split(",");
                    for (var j = 0; j < userVals.length; j++)
                    {
                        passedParameters[userVals[j].split("=")[0].trim()] = userVals[j].split("=")[1].trim();
                    }
                }
                else
                {
                    passedParameters[vals[i][0]] = vals[i][1];
                }
            }
        }
        return passedParameters;
    }

The custom parameters should be in the form “Name=Value” should be separated by comma.

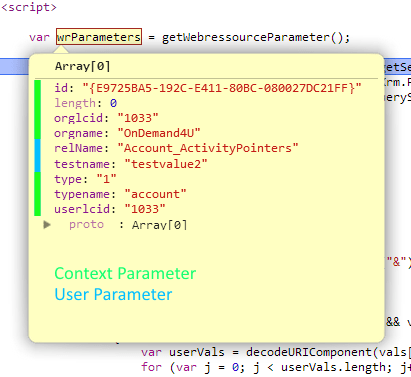
The debugger shows you all the accessible parameters:

Context parameters are green marked, custom parameters blue.

You can now access your values through the named array.

var wrParameters = getWebresourceParameter();
    var myRelName = wrParameters["relName"];

Have fun with it!

Dynamics CRM Bookmarklets

Posted in Dynamics 365, and Power Platform

Nachdem ich im Netz immer wieder über pfiffige Bookmarklets für Dynamics CRM stolpere (vor allem auf dem Blog der Kollegen von Magnetism) und mittlerweile auch ungefähr zwanzig Stück davon in meiner Lesezeichenleiste im Einsatz habe, möchte ich diese für euch sammeln und mit euch teilen.

Kommen wir erstmal zur Definition einer Bookmarklets, damit Ihr wisst worüber ich spreche: Ein Bookmarklet ist ein in JavaScript geschriebenes Makro, das als Lesezeichen abgespeichert wird und dadurch die Funktionen eines Webbrowsers erweitert. Es erlaubt das Aussehen oder die Funktionalität von Webseiten (Dynamics CRM ist mehr oder weniger nur eine Webseite) clientseitig zu verändern.

Ihr könnt die Bookmarklets einfach per Drag&Drop in eure Lesezeichenleiste ziehen oder ihr kopiert die die URL und erstellt euch ein neues Lesezeichen mit dieser.

CRM Bookmarklets für Anwender

CRM Bookmarklets für Administratoren und Systemanpasser

Connect Powershell with Azure VM

Posted in Microsoft Azure

You can connect a PowerShell with your Azure VM and use it as if you were sitting in front of the remote machine.
But why would you want that?

  • It uses less more resources, because the server doesn’t need to show a graphical user interface
  • There is no Terminal Server license required
  • Recurring tasks can be completed faster by scripts.

The connection between PowerShell and your Azure VM could not be established by not only typing a few commands, you also need to do a few preparations on the server and client side.

Endpoint for die Azure VM

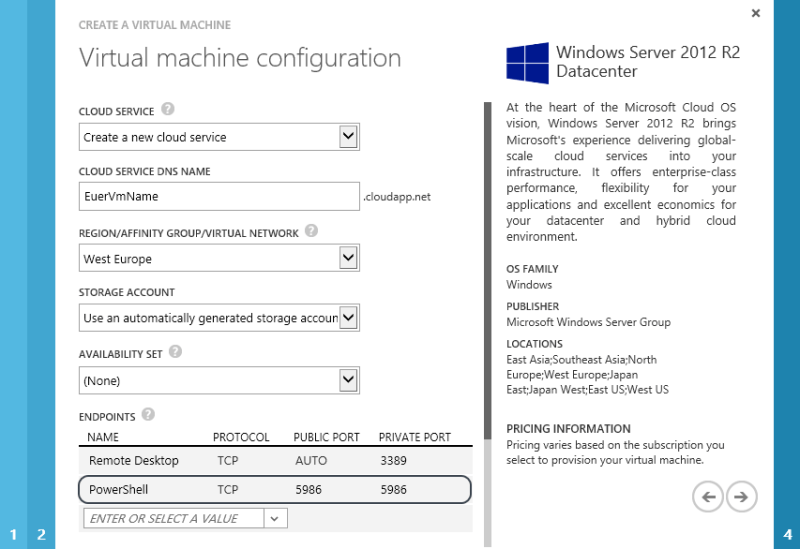
An endpoint (Private Port 5986) must be defined for PowerShell on the server side. When you create a new VM from the gallery in the Azure Management PortalAzure Management Portal creates this directly for you.

Under “endpoints” of your VM you can check if everything is correct or make subsequent changes or additions.

With PowerShell itself you can of course also manage the endpoints for the VM. The corresponding cmdlets are:

As you can control Azure VMs with PowerShell, I have described here.

SSL certificate for the client

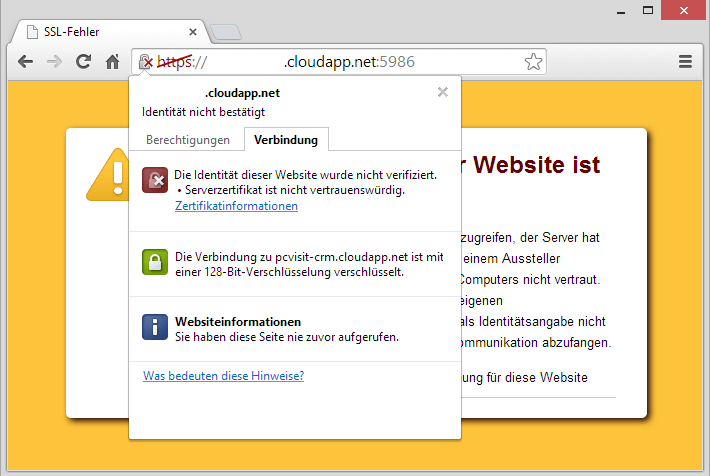
Since Azure VMs are backed up on a self-signed SSL certificate, you must install this before for your client.
Call the URL https://YOURVM.cloudapp.net:YOURPUBLICPORT, best with Chrome on. There is no website that appears, but Chrome offers you to save the certificate.

Click on the appearing lock in the address bar, and in the following menu on “Certificate information”.
In the opening Certificate window you will find the tab “Details” the opportunity to save the certificate locally.
Just leave this all to the default settings.

Now open the saved certificate, and select the tab “General” then “Install Certificate”.
In the following dialogue you stay on “current user”, but select “all certificates in the following store” and the location “Trusted Root Certification Authorities”.

Have you done everything right you do not see this error message when you perform the next step.

Enter-PSSession : Connecting to remote server EUREVM.cloudapp.net failed with the following error message : The SSL connection cannot be established. Verify that the service on the remote host is properly configured to listen for HTTPS requests. Consult the logs and documentation for the WS-Management service running on the destination, most commonly IIS or WinRM. If the destination is the WinRM service, run the following command on the destination to analyze and configure the WinRM service: “winrm quickconfig -transport:https”. For more information, see the about_Remote_Troubleshooting Help topic.
At line:1 char:1
+ Enter-PSSession -ComputerName EUREVM.cloudapp.net -Port 5986 -Credential A …
+ ~~~~~~~~~~~~~~~~~~~~~~~~~~~~~~~~~~~~~~~~~~~~~~~~~~~~~~~~~~~~~~~~~~~~~~~~~~~~~~~~
   + CategoryInfo          : InvalidArgument: (EUREVM.cloudapp.net:String) [Enter-PSSession], PSRemotingTransportException
   + FullyQualifiedErrorId : CreateRemoteRunspaceFailed

Connect PowerShell with Azure VM

With the following command you can now connect to the Public Port of Endpoint your PowerShell with the Azure VM::

Enter-PSSession -ComputerName YOURVM.cloudapp.net -Port YOURPUBLICPORT -Credential USERNAME –UseSSL

Control Azure VMs with Powershell

Posted in Microsoft Azure

Like any physical or virtual server, Microsoft Azure VMs can be started, rebooted and shut down. You can do this through the Microsoft Windows Azure Management Portal, or through the new Microsoft Azure Portal.
But you can also control Azure VMs with your local PowerShell.

Requirements


Clearly, an Azure subscription and in addition you need the Azure Powershell Modul.
This then installed everything else is needed, for example the .NET framework.

Connect


Start your Powershell and import the Azure CmdLets.

Import-Module 'C:\Program Files (x86)\Microsoft SDKs\Windows Azure\PowerShell\Azure\Azure.psd1'

Download the Azure Abonnement Certficate if you haven’t already one.
pre>Get-AzurePublishSettingsFile
An Azure website opens an the download starts. Save the file localy and open that path with your PowerShell.

Import that file in Powershell. Tip: use autocomplete with tabulator.

Import-AzurePublishSettingsFile 'PATH\SUB_NAME-DOWNLOAD_DATE-credentials.publishsettings'

Control Azure VMs with Powershell


With this CmdLet you get a list of VMs of the subscription.

Get-AzureVM | FT

Dies Zeigt euch die VM-Namen und die Service-Namen an. Beide braucht ihr für die weiteren Kommandos.
This shows you the names and service-names of your VMs. You need both information for further commands.
Start VM

Start-AzureVM -ServiceName YOURSERVICENAME -Name YOURVMNAME

Reboot VM

Restart-AzureVM -ServiceName YOURSERVICENAME -Name YOURVMNAME

Shuot down VM

Stop-AzureVM -ServiceName YOURSERVICENAME -Name YOURVMNAME–Force

This does completly shut down the VW, so that it it will not produce any costs.
VM löschen

Remove-AzureVM -ServiceName YOURSERVICENAME -Name YOURVMNAME –DeleteVHD

Caution: The VM and the hard drive are gone after that.

Summary


If you save the functions shown here in a script from, you can relatively quickly control Azure VMs with PowerShell so the check the status or high accordingly, shutdown or restart.
With the Azure Abonnement Zertifikat someone without access to the management portal can control the Azure VMs with Powershell.

You find the complete Azure Cmdlet Referenz at the MSDN and also examples how to create Azure VMs with Powershell.